Guide to Shift Tagging and Custom Tabs
Jen Muggleton,
Customer Support at Locum’s Nest
What is Shift Tagging?
Shift Tagging allows you to assign custom tags to your shifts, making it easier to categorise, search, and filter them. These tags appear below each shift in the My Shifts list and can be filtered using a convenient dropdown menu at the top of the table. Best of all, you’ll have access to both the tags you create and those created by others within your organisation. It’s a great way to stay on top of everything!
How to add Tags to your shifts?
Adding tags to shifts is simple, and can be done in two main ways: when posting or editing a shift, and directly from the My Shifts table. Here, we break down the two different ways.
1/ Adding tags when posting or editing a shift
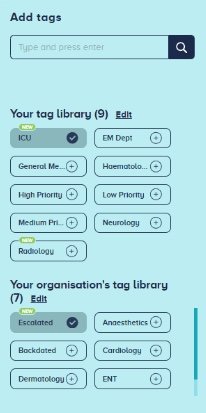
Locate the 'Add Tag' Box: When posting or editing a shift, you’ll find the 'Add Tag' option under the 'Pre Match' widget.
Select the Tag: Click on the tag to apply it to the shift. If you change your mind, simply click the tag again to deselect it.
Search for Tags: If you have a specific tag in mind but can’t immediately see it, use the search box at the top of the widget to find it quickly.
Remove tags: Remove them at any time by clicking on them again.
2/ Adding Tags via the ‘My Shifts’ Table
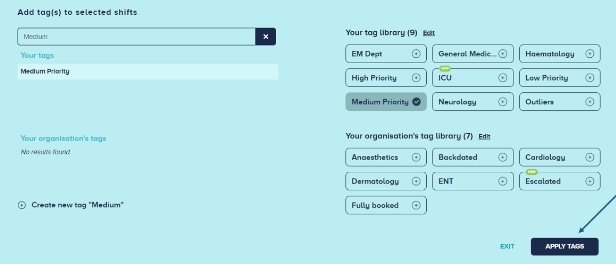
Select Your Shifts: Check the box next to the shift(s) you want to tag.
Use the Quick Actions Menu: At the bottom of the table, select 'Tag' from the Quick Actions menu.
Apply Tags: This opens a widget similar to the one used in the shift editing mode. Click on the desired tags to apply them or remove tags by clicking on them again. Don't forget to press 'Apply Tags' to save your changes!
Creating a New Tag:
If no tag in the current library suits your needs, you can easily create one yourself.
Search for a Tag: Start typing in the search bar, and if no matches are found, the 'Create New Tag' option will appear at the bottom of the widget.
Add Your Tag: Once created, this tag will be added to your library and automatically applied to the selected shift(s).
Top tip: You can add up to a maximum of 9 tags to any single shift, giving you plenty of options to keep relevant tags
Deleting a Tag:
Tags can be deleted when they are no longer needed. You can do this by:
Editing your Tags: In the 'Add Tag' widget, click the 'Edit' button next to your Tag Library.
Deleting Tags: You’ll see a list of all your tags. Select the ones you want to delete and click 'Permanently Delete'. Keep in mind, that deleting a tag will remove it from all shifts it was assigned to.
Custom Tabs for ultimate organisation
Do you love being an ultimate organiser? If you frequently use the same searches or filters for shifts and timesheets, you can save them as a new custom tab at the top of your screen.
Save Your Searches: After applying your desired filters, simply save them as a new tab.
Rename the Tab: Double-click on the default name ('New Tab') and type in your preferred title. This way, you can easily identify what each tab represents—no more guessing games!
Custom tabs are perfect for creating a bird’s-eye view of your most important filters and searches.
Final Thoughts
Shift Tagging and Custom Tabs are powerful features designed to help you manage your shifts more efficiently. By using Custom Tags, you can easily categorise and find shifts whereas Custom Tabs allow you to save your frequently used filters.
If you need assistance, don't hesitate to reach out to the Support team via email or via the help centre on the app dashboard (the speech bubble at the bottom of the left-hand menu), which is also where you will find all our user guides and be able to message the Support team directly for any additional questions.
____
This blog was a follow up on our last Asking For a Friend webinar series. Keep an eye out for our next one and join us for more useful support content like this!
Any further questions about Tags & Tabs? Get in touch by emailing support@locumsnest.co.uk.


